Introduction
This activity introduces screen reader vocabulary to students using Microsoft MakeCode for micro:bit for the first time.
In this activity, students will learn how to open a project in MakeCode and navigate the project to read it. They will also modify input values to change the program, and download it to a BBC micro:bit.
The project will play a start sound when the micro:bit is powered or reset.
What you need
- micro:bit V2 connected to MakeCode (see Preparation below)
- 50cm to 1m long USB A to micro USB connector cable (the additional length to the standard 0.3m cable helps with freedom of movement)
- Computer with a keyboard
- Screen reader software
- Glossary
- Tactile code for this activity. Choose one of the following:
- Start sound tactile cut-out blocks (including the MakeCode tactile toolbox key)
- Start sound completed tactile program (including the MakeCode tactile toolbox key)
- Start sound text program (for use with a braille embosser or as a digital document)
- Optional: Keyboard controls for MakeCode (text guide)
- Optional: Refreshable braille device
Preparation
In these activities, instructions are given for Windows users. Mac users should use Command instead of Control and Option instead of Alt when using keyboard controls.
Before downloading your program to the micro:bit for the first time, you need to go through a series of steps to connect the micro:bit to MakeCode. These steps are screen reader accessible. However, we recommend educators complete these steps as part of preparation in this activity to give beginners a straightforward first experience. To do this, in MakeCode press Control + B then 5 to move to the Bottom bar then press Tab to move to the Download Options button and then press Enter and choose Connect Device, then follow the steps.
After connecting, a single L keypress can be used by the student to download a program to the micro:bit.
If you are using the MakeCode tactile cut-out blocks, set up the blocks to match the Start sound project.
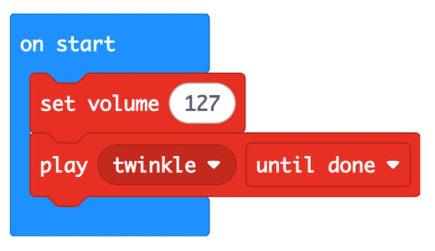
Using the blocks, talk the student through creating the completed project to introduce vocabulary, block shapes and replacing inputs.
Instructions
Explore the tactile code
The micro:bit needs a program to tell it to do something.
Explore the tactile program and read the code.
Each code block starts with a tactile icon. Use the MakeCode tactile toolbox key to find out which section a block comes from. The ‘set volume’ and ‘play’ blocks both have the same tactile icon to represent the Music section.
The ‘on start’ block is a container block. You can put other blocks inside it. The two other blocks inside it are indented.
The ‘set volume’ block is a statement block. A statement block gives the micro:bit an instruction.
Some blocks have inputs that you can change.
In MakeCode, you can change the number input on the ‘set volume’ block as well as the melody input in the ‘play’ block.
If you are using the MakeCode tactile cut-out blocks, change inputs with different value blocks.
Tips:
- Fully explore each block including the shape of each block. Container blocks have a separate start and end.
- Some blocks have multiple braille labels for the name of the block and its inputs so explore the full length of each block.
Activity walkthrough
This video provides step-by-step instructions to guide you through the activity using keyboard controls and a screen reader. The video includes the screen reader output from MakeCode. Exact screen reader output will depend on the screen reader software and user settings. Key presses are audio narrated and shown on the screen.
Note:
- The video was created on a Windows computer. Mac users should use Command instead of Control and Option instead of Alt.
- The screen reader output varies based on screen reader software and settings. The NVDA screen reader is used in the video.
- The male voice is the screen reader output. The female voice announces key presses.
Open the project in MakeCode
- Open the Start sound project in MakeCode. Be warned, a loud sound will play on start.
- Press Tab to reach Skip to Blocks workspace and then Enter.
- If the guided tour is announced, in order to follow this activity, press Escape to close it.
- From the blocks workspace, press Alt + Shift + A to turn on screen reader mode.
Tips:
- You can get to the workspace at any time by pressing Control + B, then 4.
- Screen reader mode includes hard stops instead of wrapping when navigating blocks and beeps when changing container levels.
- Screen readers usually provide a command for reading the currently focused element which is usually screen reader key + Tab.
- To open or close the keyboard controls help, press Control + /.
Navigate the project
In MakeCode, code blocks are placed on the workspace.
The Start sound project already has code blocks on the workspace.
Use the down and up arrow keys to read the code blocks.
Read the ‘on start’ block
- Find the ‘on start’ block. This is the first block in the workspace. It will announce: begin stack, on start, container.
- Begin stack means this is the start of a stack of connected blocks.
- ‘on start’ is the name of the block which runs blocks inside it when the micro:bit starts.
- Container means that the ‘on start’ block can contain other blocks inside it.
Tip:
- Most screen readers have a command to announce the current element again. This is usually the screen reader key + Tab.
Read the ‘set volume’ block
Press the down arrow key to reach the ‘set volume’ block. It will announce: set volume, 127, has input, statement.
- ‘set volume’ is the name of the block that controls how loud the sound is on the micro:bit speaker
- 127 is the number that the volume is automatically set to
- has input means the ‘set volume’ block has an input which can be reached with the right arrow key
- statement means the ‘set volume’ block does something
Read the ‘play’ block
Press the down arrow key to reach the ‘play twinkle’ block. It will announce: play, twinkle, until done, has inputs, statement.
- ‘play’ is the name of the block that can play music or sounds
- twinkle is the melody that is currently selected
- until done is an input that controls how the melody plays
- has inputs means the block has inputs that can be reached with the right arrow key
- statement means the block does something
Read the end of the block stack
Press the down arrow key to reach the end of the ‘on start‘ block. It will announce: end on start, statement position
- end on start is the end of the ‘on start‘ container block
- statement position means you can add another statement block after the last block in the ‘on start‘ container block
Press the down arrow key to reach the end of the program. You will hear a beep when you get to the end of the code.
Tips:
- You can use a screen reader command to read the currently focused block if you need to hear it again. This is usually the screen reader key + Tab.
- When you move inside a block you hear a higher pitched beep. When you move outside a block you hear a lower pitched beep.
- In MakeCode, pressing Tab moves you around the editor. If you accidentally press Tab you can return to the workspace by pressing Control + B, then 4.
Download the project
- Connect your micro:bit to your computer with a USB cable.
- Press L to download the program to the micro:bit. The micro:bit will play the twinkle sound.
Tips:
- If you have not connected the micro:bit to MakeCode before the activity, you will be taken through the connection steps now.
- You may miss hearing the sound on the micro:bit when the screen reader is announcing. Press Control to interrupt the screen reader or press the reset button on the back of the micro:bit to run the program again.
Change the volume
- Use the up and down arrow keys to find the ‘set volume’ block.
- Press the right arrow key to move to 127. This input is a number.
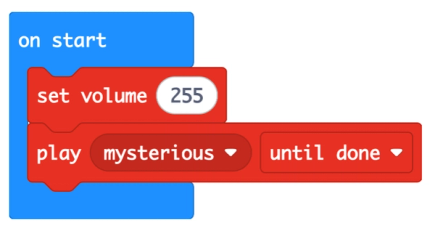
- Press Enter to edit the volume. The current value is selected. Type 255, then Enter.
- Press L to download the program to the micro:bit and try it. The sound should be louder.
Tips:
- When you edit a number the current value is selected and you can start typing. You can reselect the value using Control + A, or use the arrow keys and the Backspace key to delete the current value.
- You don’t need to listen to the whole screen reader output before pressing another key.
Change the melody
- Use the up and down arrow keys to find the play block.
- Press the right arrow key to move through the list to the twinkle.
- Press Enter to edit the melody.
- Use the up and down arrow keys to choose a melody, then press Enter to confirm.
- Press L to download the project and try it on your micro:bit.
- Repeat until you find a melody you like.
Tip:
- The melody will play in MakeCode on your computer after you confirm your change.
The completed program is available below:
Make it your own
- Explore different melodies
- Change the volume
What next?
Try Activity 4: Doorbell.