子どもたちがすでに知っている物語と登場人物を使って、AIについて学ぶ micro:bit AIを使った方法
やさしいプロジェクトガイド
ステップ 1: 理解する
動作の仕組み
このプロジェクトでは、機械学習 (ML) モデルをトレーニングして、BBC micro:bit を取り付けたぬいぐるみの動きを認識できるようにします。 お話をつくるための動きを選びます。
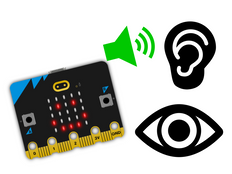
次に、機械学習モデルと Microsoft MakeCode プログラムを組み合わせます。 micro:bitは、これらの動きが検出されたときに音を再生したり、アイコンを表示したりします。
機械学習とは何ですか?
機械学習 (ML) は、コンピュータがデータに基づいて学習し、意思決定できる人工知能 (AI)の一種です。
ML モデルは、たとえば micro:bit をさまざまな方法で動かしたときに、さまざまな「アクション」を認識するなど、決定を下すのに役立つよう人がトレーニングします。
必要なこと
AIシステムは、人間が設計し、組み立て、テストしてから使う必要があります。
まず、あらかじめ用意された動きを使うのか、それとも自分のストーリーに合った別の動きを選ぶのかを決める必要があります。 私たちのお話は、ルーシーという体操選手になりたいクマさんのお話なので、このテーマに合った動き(ジャンプ、転がる、寝る)を選びました。
それから、MLモデルを訓練するためのデータを収集し、それをテストし、改良し、プログラムと組み合わせて、micro:bitとmicro:bit CreateAIウェブサイトを使って、お話をしてくれるAIデバイスを作ります。
また、通常のアルゴリズムやプログラムを使用したプロジェクトと、このAIプロジェクトを比較するための評価問題も用意しました。
ステップ2: プログラムする
必要なもの
- micro:bitと単4電池2本が入る電池ボックス
- ChromeまたはEdgeウェブブラウザを使用して、micro:bit作成AIのウェブサイトにアクセスできるコンピューター(デスクトップ、ラップトップ、またはChromebookなど)
- コンピュータにBluetoothが搭載されていない場合は、micro:bit V2が別途必要になります。
- ぬいぐるみと、ストラップとホルダー、またはmicro:bitをおもちゃに取り付ける別の方法(柔軟な手作りのハンドルやゴムひもなど)
- micro:bit CreateAIを指導するヒントも役立つかもしれません
データサンプルの収集
micro:bit CreateAIでプロジェクトを開くと、ぬいぐるみにおすすめの動き(ジャンプ、転がる、寝る)のデータサンプルが表示されます。
micro:bitの加速度センサーを使って、あなたが持っているぬいぐるみの動作サンプルを追加することができます。
jumping
rolling
sleeping
micro:bit CreateAIで「接続する」ボタンをクリックしてデータ収集用のmicro:bitを接続し、指示に従ってください。
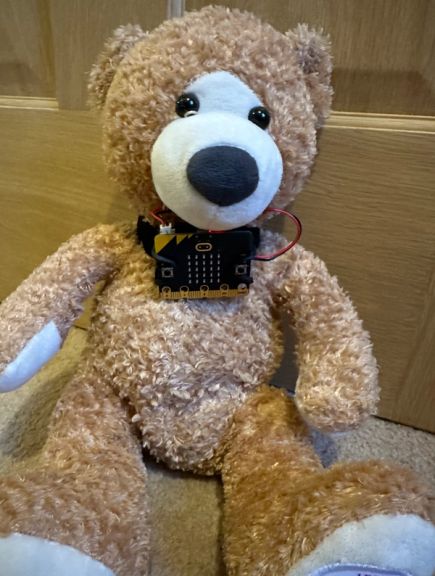
データ収集用micro:bitをぬいぐるみに装着します。 どのサンプルを記録するときにも、ぬいぐるみにmicro:bitが同じ向きで装着されているようにしてください。 あらかじめ用意されているサンプルをプロジェクトで使用する場合は、下の写真のように、micro:bitをぬいぐるみの首に前向きに取り付けます。 ぬいぐるみにつけるmicro:bitの向きを変更したい場合は、データサンプルをすべて自分のものに置き換えてください。

ジャンプ、転がる、寝るなど、オリジナルの動きのデータサンプルを追加しましょう。 各アクションを順番にクリックし、「記録」をクリックしてそれぞれの短いサンプルを撮る。
間違えた場合は、不要なサンプルを削除できます。 micro:bit のボタン B を押して記録を開始することもできます。
すべての 「ジャンプ 」のデータサンプルは同じようになっているか確認しましょう。 すべての「転がる」のデータサンプルは、「ジャンプ」や「寝る」と違って見えますか?
モデルのトレーニングとテスト
「モデルのトレーニング」(Train model)ボタンをクリックしてモデルをトレーニングし、テストします。
ぬいぐるみを上下に動かしてジャンプさせ、「ジャンプ」が推定アクションとして表示されるかどうかを確認しましょう。 ぬいぐるみを寝かせて、「寝る」と推定されるかどうかを確認します。 ぬいぐるみをでんぐり返しさせて「転がる」が検出されるかどうかをテストします。
他の人にもぬいぐるみを動かしてもらい、同じように推定されるかどうかを確認します。
モデルの改善
ほとんどのモデルは、より多くのデータを学習させることで精度を上げることができます。 アクションを認識するためにモデルの改善が必要な場合には、「← データ サンプルを編集」(← Edit data samples)をクリックします。
(同じアクションの他のデータサンプルと全く異なって見えるため)ふさわしくないと思うサンプルは、ケズコトでデータセットをきれいにすることができます。 また、自分自身や他の人からのサンプルを追加してモデルを改善することもできます。
ぬいぐるみが「寝る」と見なせる他の向きも考えてみてください。micro:bitの角度によって、x、y、zラインの順番が変わることに気づくでしょう。
モデルを再度トレーニングし、再度テストします。
モデルとプログラムをmicro:bitに入れる
micro:bit CreateAI で、「MakeCode で編集」(Edit in MakeCode)をクリックすると、MakeCode エディターでプロジェクトのプログラムが表示されます。
他の micro:bit MakeCode プロジェクトと同じようにプログラムを変更したり、そのまま試したりできます。
USB データ ケーブルで micro:bit を接続し、MakeCode 画面の 「ダウンロード」ボタンをクリックして、指示に従って AI モデルとプログラムを micro:bit に転送します。
micro:bit を取り外し、電池ボックスを取り付けてぬいぐるみに装着し、テストします。
プログラムの仕組み
'MLが… を開始したとき' ブロックはぬいぐるみが訓練されたアクションの1つを開始したとMLモデルが判定したときに実行されます。 ぬいぐるみが行っていると推定されるアクションに応じて、それぞれのメロディを流したり、micro:bitのLEDディスプレイにアイコンを表示したりします。
「MLが...を停止したとき」ブロックは、ぬいぐるみがアクションを終了したとMLモデルが判断したときに実行されます。 各ブロック内のコードは画面を消し、すべての音を止めます。
追加ブロックの「ML上で不明なものが開始したとき」は、モデルがあなたのおもちゃがどのアクションをしているのかわからない場合に画面を消します。
評価
このプロジェクトと、同じく加速度センサーを使ってさまざまな動きに反応するものの、機械学習やその他のAIを使っていないセンサリー・トイ・プロジェクトを比べてみましょう。
- センサリー・トイ・プロジェクトは、どのような動き(アクション)に反応しますか?
- AIをつかったお話ロボットが反応できるアクションの種類に、どんなちがいがありますか? もっと単純ですか、それとも複雑ですか?
- 他にどのようなアクションをMLモデルが検知できるように学習させたいですか?
- あなたのストーリーを伝えるのに、どちらのプロジェクトが適していますか?
ステップ 3: 拡張する
- AIをつかったお話ロボットと一緒にさまざまな動きを試して、 有名なお話やおとぎ話に合わせてアクションを変えてみましょう。
- 「アイコンを表示」ブロックの代わりに「LED画面に表示」ブロックを使って、ストーリーに合ったアイコンをカスタマイズします。 LEDプランニングシートを使って、オリジナルのアイコンを計画してもいいでしょう。
- クラスのマスコットキャラクターがいるなら、CreateAIを使ってマスコットを訓練し、動きに反応して生徒に反応する(褒め言葉やクラスポイントのご褒美など)ようにトレーニングしてもいいでしょう。
This content is published under a Creative Commons Attribution-ShareAlike 4.0 International (CC BY-SA 4.0) licence.


