Fabriquez un interrupteur intelligent avec micro:bit CreateAI qui allume la lumière lorsque vous applaudissez et l'éteint lorsque vous agitez la main.
Guide de projet étape par étape
Étapes 1 : comprendre
Comment ça marche ?
Dans ce projet, vous allez entraîner un modèle d'apprentissage automatique (ML) à reconnaître lorsque vous applaudissez et saluez de la main.
Vous allez combiner ce modèle avec un programme MakeCode qui envoie un signal radio « lightsOn » à un autre micro:bit chaque fois que vous applaudissez, et un signal radio « lightsOff » chaque fois que vous agitez la main.
Lorsque le récepteur micro:bit reçoit le signal « lightsOn », toutes ses LED s'allument. Lorsqu’il reçoit le signal ‘LightsOff’, il efface l'écran LED.
Qu'est-ce que l'apprentissage automatique ?
L'apprentissage automatique (Machine Learning en anglais) est une sorte d'intelligence artificielle (IA) où les ordinateurs peuvent apprendre et prendre des décisions basées sur des données.
Les modèles d'apprentissage sont formés par les humains pour les aider à prendre ces décisions, par exemple, pour reconnaître différentes ‘actions’ lorsque vous déplacez votre micro:bit de différentes manières.
Que dois-je faire ?
Les systèmes IA ont besoin d'êtres humains pour les concevoir, les construire, les tester et les utiliser. Vous allez collecter des données pour entraîner un modèle ML, le tester, l'améliorer et le combiner avec un code informatique afin de créer un appareil intelligent qui utilise l'IA. Vous utiliserez un micro:bit et le site web micro:bit CreateAI pour faire cela.
Étape 2 : programmer
Ce dont vous aurez besoin
- Deux micro:bit V2, un câble USB, un ou deux packs de piles
- Un ordinateur (par exemple un ordinateur de bureau, un ordinateur portable ou un Chromebook) avec accès au site web micro:bit CreateAI, en utilisant un navigateur web Chrome ou Edge.
- Si votre ordinateur n'est pas équipé de la fonction Bluetooth, vous aurez besoin d'un micro:bit V2 supplémentaire.
- Une sangle et un support, ou un autre moyen de fixer le micro:bit à vous-même (par exemple, des tiges flexibles ou des élastiques)
- Vous pouvez également trouver nos conseils pédagogiques micro:bit CreateAI utiles
Collecter des échantillons de données
Lorsque vous ouvrez le projet dans micro:bit CreateAI, vous verrez que nous vous avons fourni des échantillons de données pour les actions « marcher », « sauter » et « rester immobile » :
waving
clapping
still
Vous pouvez ajouter vos propres échantillons de mouvement à l'aide du capteur de mouvement ou de l'accéléromètre du micro:bit.
Dans micro:bit CreateAI, cliquez sur le bouton « Se connecter » pour connecter votre collection de données micro:bit et suivez les instructions.
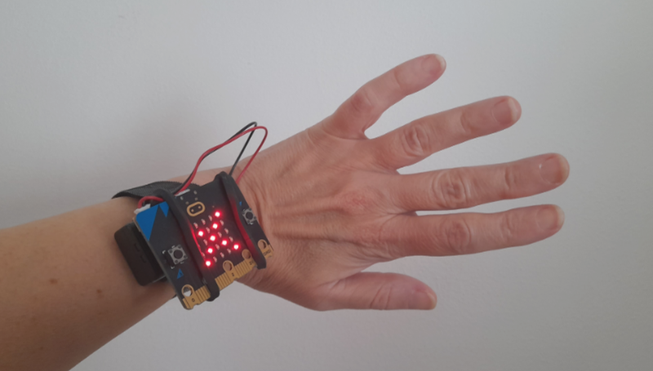
Attachez le micro:bit à votre poignet. Cliquez sur la première action, « waving » (saluer), et cliquez sur « Record » (enregistrer). En cas d'erreur, vous pouvez supprimer les échantillons que vous ne souhaitez pas. Vous pouvez également appuyer sur le bouton B du micro:bit pour commencer l'enregistrement.
Si vous souhaitez enregistrer en continu pendant 10 secondes pour obtenir 10 échantillons, cliquez sur les trois points à côté du bouton Enregistrer et sélectionnez cette option.
Enregistrez maintenant vos propres échantillons de données pour les actions « applaudir » et « immobile », en veillant à collecter des échantillons dans différentes positions pour « immobile », par exemple face vers le haut et vers le bas.
Entraîner et tester le modèle
Cliquez sur le bouton « Entraîner le modèle » pour entraîner le modèle. Try clapping, waving and keeping still to see if those actions are estimated. Give your micro:bit to someone else to wear (making sure they put it on the same wrist and in the same orientation) and see if it works as well for them.
Améliorer votre modèle
La plupart des modèles peuvent être améliorés avec plus de données. If the model needs improving, click on ‘← Edit data samples’.
You can delete any data samples which you think don’t fit or add more samples.
Entraînez à nouveau le modèle et testez-le à nouveau.
Mettez le modèle et le code sur votre micro:bit
Dans micro:bit CreateAI, cliquez sur « Modifier dans MakeCode » pour voir le code du projet dans l'éditeur MakeCode.
You can modify the code or just try it out as it is. Attach the first micro:bit using a USB cable, click on the ‘Download’ button in the MakeCode screen, and follow the instructions to transfer your AI model and the code blocks to it. Afterwards, download again onto another micro:bit.
Attach a battery pack to the sender micro:bit. You can keep the receiver micro:bit plugged into the computer or attach it to battery pack. Now wear the sender micro:bit and test it out.
Comment fonctionnent les blocs de code
When the program starts, the radio group is set to 52. Radio groups are like channels, so any micro:bit using the same group will get the message. Vous pouvez utiliser n'importe quel numéro de groupe de 0 à 255. If you are using this project in a class or coding club, you might like to encourage each pair or group of students to use a different radio group from others in the class.
The 'on ML... start' blocks are triggered when the sender micro:bit’s ML model decides you have started waving, clapping or being still.
If you are clapping, the ‘on ML clapping start’ block causes a tick icon to appear on the LED display of the sender micro:bit and the radio message ‘lightsOn’ to be sent to the receiver micro:bit. If you are waving, the ‘on ML waving start block’ causes a cross icon to appear on the LED display of the sender micro:bit and the radio message ‘lightsOff’ to be sent to the receiver micro:bit.
If you are still or the sender micro:bit can’t recognise your movements, the LED display is cleared and no radio message is sent.
The ’on radio received’ blocks turn on all the LEDs on the receiver micro:bit if a message is received saying ‘lightsOn’ and clear the screen if a message is received saying ‘lightsOff’.
The ‘on radio received lightsOn / lightsOff’ blocks are from a MakeCode extension called ‘Radio broadcast’. If you want to code this project yourself, you can find the blocks by clicking on ‘Extensions’ then choosing ‘Radio broadcast’.
Évaluation
How accurate is the light switch in turning on and off in response to your movements? How could you improve it, if needed?
How useful would this device be in real life? How does it compare to a regular light switch?
Étape 3 : étendre
- You could light up a room by putting the same code on multiple micro:bits. Keep the other micro:bits still while someone moves another to turn them all on or off.
- Add a fourth action which causes the receiver micro:bit to show dimmed lights. Use the ‘set brightness’ block, found in the LED section under ‘More’.
Vous pourriez aussi aimer
Créer un minuteur d'exercice intelligent à l'aide de l'IA
Utiliser l'IA pour détecter et chronométrer des activités spécifiques
Contrôler les lumières avec le son
This content is published under a Creative Commons Attribution-ShareAlike 4.0 International (CC BY-SA 4.0) licence.