A great way to use what children already know about narrative and character development to support new learning about AI.
Guia de projeto passo a passo
Passo 1: Entendendo o projeto
How does it work?
In this project you’ll train a machine learning (ML) model to recognise different ways that you move a soft toy with a BBC micro:bit attached to it. You’ll choose movements to help you retell a story.
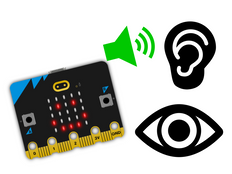
You will then combine the machine learning model with a Microsoft MakeCode program, and the micro:bit will play sounds or show images when these movements are detected.
O que é aprendizado de máquina?
Aprendizado de máquina é uma espécie de inteligência artificial em que os computadores podem aprender e tomar decisões com base em dados.
Modelos AM são treinados por humanos para ajudá-los a tomar essas decisões, por exemplo, reconhecer diferentes "ações" quando você movimenta o micro:bit de formas diferentes.
O que precisarei fazer?
AI systems need humans to design, build, test, and use them.
First, you will need to decide if you want to use the movements we have provided, or choose different movements that work for your own story. Our story is about a bear called Lucy who wants to be a gymnast, so we have chosen movements that fit this theme: jumping, rollling, and sleeping.
You will then collect data to train the ML model, test it, improve it and combine it with computer code to make a storytelling device that uses AI, using a micro:bit and the micro:bit CreateAI website.
We’ve also included some evaluation questions to compare this AI project with one that just uses normal algorithms and code.
Passo 2: Criando o projeto
Do que é que precisas
- Um micro:bit V2, cabo de dados USB, soquete de bateria com duas baterias AAA
- A computer (e.g. desktop, laptop, or Chromebook) with access to the micro:bit CreateAI website, using a Chrome or Edge web browser
- Se o seu computador não tiver a função Bluetooth, você precisará de um micro:bit V2 extra
- A soft toy and a strap and holder, or another way to attach the micro:bit to your toy (e.g. flexible craft stems or elastic bands)
- You may also find our micro:bit CreateAI teaching tips useful
Coletar amostras de dados
When you open the project in micro:bit CreateAI, you’ll see we’ve given you data samples for some suggested movements for your soft toy (jumping, rolling, and sleeping):
You can add your own soft toy movement samples using the micro:bit's movement sensor, its accelerometer.
jumping
rolling
sleeping
In micro:bit CreateAI, click the ‘Connect’ button to connect your data collection micro:bit and follow the instructions.
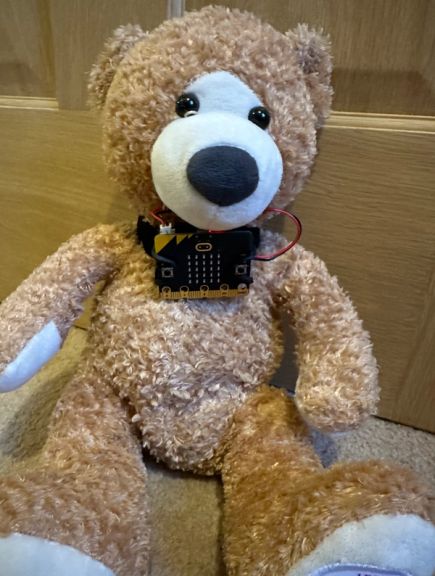
Attach the data collection micro:bit to your soft toy. It’s important that all the samples are recorded with the same placement of the micro:bit on the soft toy. If you want to use the ready-made samples in the project, attach the micro:bit around the neck of the soft toy facing forward, as shown in the picture below. If you want to change how the toy wears the micro:bit, replace all the provided data samples with your own.

Add your own movement data samples for jumping, rolling and sleeping. Click on each action in turn, then click ‘record’ to take a short sample of each.
Se você cometer um erro, pode excluir quaisquer amostras que não desejar. Você também pode pressionar o botão B no micro:bit para começar a gravar.
Examine the data samples: do all the ‘jumping’ samples look similar? Do all the ‘rolling’ samples look different to ‘jumping’ and ‘sleeping’?
Treine e teste o modelo
Clique no botão "Treinar modelo" para treinar o modelo, e então teste-o.
Bounce your soft toy up and down to see if ‘jumping’ is shown as the estimated action. Put the soft toy down to sleep and see if ‘sleeping’ is estimated. Test if ‘rolling’ is detected when you turn the soft toy head over heels.
Ask someone else to move the toy and see if it works as well for them.
Melhore seu modelo
A maioria dos modelos pode ser melhorado com mais dados. Se o modelo precisa ser melhorado para reconhecer suas ações, clique em ‘Editar amostras’.
You can clean your data set by deleting any samples which you think don’t fit (because they look completely different from other samples for the same action). Você também pode melhorar o modelo adicionando mais amostras de si mesmo e de outras pessoas.
Think about all the positions your soft toy might ‘sleep’ in, you’ll notice the x, y, and z lines change their order depending on the angle of the micro:bit.
Treine o modelo de novo e teste-o novamente.
Coloque o modelo e o código no seu micro:bit
No micro:bit CreateAI clique em 'Editar no MakeCode' para ver o código do projeto no editor MakeCode.
Você pode modificar o código da mesma forma que faria em qualquer projeto micro:bit MakeCode, ou apenas experimente do jeito que ele está.
Anexe o micro:bit usando o cabo de dados USB, clique no botão 'Download' na tela MakeCode e siga as instruções para transferir seu modelo IA e os blocos de código para o micro:bit.
Unplug the micro:bit, attach a battery pack, position it on your soft toy and test it.
Como os blocos de código funcionam
The 'on ML… start' blocks are triggered when the ML model decides your toy has started one of the actions it has been trained to detect. Different sounds play and different icons are shown on the micro:bit's LED display depending on the action it has estimated your soft toy is doing.
The 'on ML… stop' blocks are triggered when the ML model decides your toy has finished an action. Code inside each block clears the screen and stops all sounds.
An extra block, ‘on ML unknown start’, clears the screen if the model is not sure which action your toy is doing.
Avaliação
Compare this project with the Sensory toy project that also uses the accelerometer sensor to react to different movements but which does not use machine learning or any other kind of AI.
- What kinds of movements, or actions, can the Sensory toy project react to?
- What is different about the kinds of actions the AI storytelling friend project can react to? Are they simpler or more complex?
- What other actions might you want to train the ML model to recognise?
- Which project is better at helping you tell your story?
Passo 3: Estendendo
- Explore different movements with your AI storytelling friend, and change the actions to suit a well-known folk story or fairytale.
- Use the ‘show LEDs’ block in place of the ‘show icons’ block to customise the icons to match your story. You could plan your customised icons using the LED planning sheets.
- If you have a class mascot, use CreateAI to train the mascot to respond to movements that give feedback to students e.g. give praise or reward class points.
This content is published under a Creative Commons Attribution-ShareAlike 4.0 International (CC BY-SA 4.0) licence.


