Step 1: Prepare
What is it?
Compare evaporation rates in warm and cold places with your BBC micro:bit.
This project is developed in partnership with White Rose Science for science teachers and allows students to understand how water changes state, and to associate the rate of evaporation with temperature.
Students can also use sequence, selection, and repetition in computer programs and work with variables and various forms of input and output.
This video explains how to do the experiment.
How it works
- The experiment can be conducted in different locations, such as on a radiator or in a fridge. You can find the temperature in a location by pressing the touch logo on the micro:bit.
- An electrical circuit is made using water in a cup, strips of silver foil attached to the inside, crocodile clip leads attached to the strips, and the other ends of crocodile clip leads connected to the micro:bit. When the water evaporates, the circuit is broken.
- The micro:bit logs whether water is present every 15 minutes by detecting whether the electrical circuit is complete.
- When water is present, the micro:bit records a ‘1’ in its data table and lights up an LED next to pin 1. When water is not present, the micro:bit records a 0 in its data table and turns off the LED next to pin 1.
What you need
- small plastic cups
- water
- teaspoon
- foil
- glue stick
- crocodile clip leads
- micro:bit(s)
- battery pack(s) with new batteries
- a computer/laptop/tablet and USB cable to enable you to view data
Step 2: Investigate
- Download the evaporation data logger hex file and put the code onto your micro:bit. Attach a battery pack. (You do not need to write the code for this project to do the experiment, but if you are interested in coding it, visit the Step 4: Code it section below.)
- Glue two strips of silver foil inside a plastic cup, on opposite sides, reaching from the rim to the base.
- Put a teaspoon of water into the cup.
- Attach two crocodile clip leads to the top of the cup, one on each strip of foil.
- Attach the other ends of the leads to pin 1 and the ground (GND) pin on your micro:bit.
- Put your micro:bit in the desired location and take a temperature reading by pressing the touch logo.
- Press button A to start logging. When logging takes place, the micro:bit beeps and a tick appears on the micro:bit’s LED display for two seconds, then an LED lights up in the top-left corner of the display.
- If water is present, an LED next to pin 1 lights up.
- When the LED next to pin 1 turns off, the water has evaporated. Press button B to stop logging. A cross appears on the LED display.
Tips
- You need to use new batteries with this experiment, particularly in cold temperatures where it can take days for the water to evaporate.
- Do not put your micro:bit in water!
- Try not to touch both pin 1 and the ground pin with your fingers – if you do, the micro:bit will falsely register that water is present, because electricity is conducting through you.
- If you need to conduct the experiment for a second time, delete the data from the micro:bit by pressing buttons A and B together. A skull appears on the micro:bit’s LED display. You should also press the reset button on the back of the micro:bit to set the time back to 0.
Step 3: Analyse
To look at the data logged, disconnect the battery pack and plug the micro:bit back into a computer. The micro:bit appears like a USB drive called MICROBIT. Look in the MICROBIT drive and open the MY_DATA file to see a table of your data in a web browser:
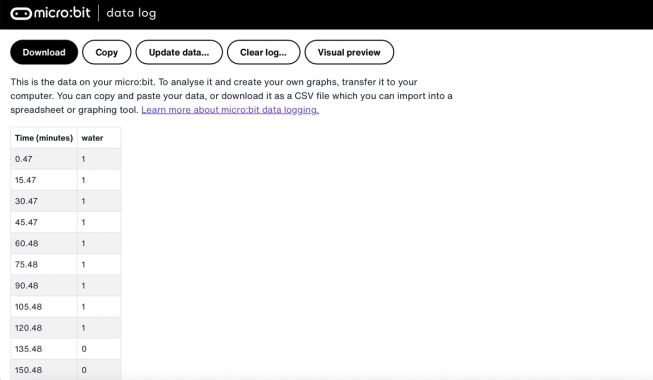
- The time stamps in the log represent the amount of time that has passed since data logging began.
- Click on Visual preview to see a graph of your data:
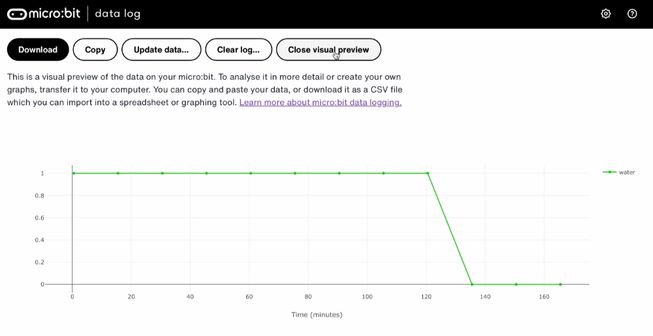
You can also click on the Copy button and then paste your data into a spreadsheet.
Step 4: Code it
Watch this video to find out how to code the project:
If you are interested in modifying the code for this project, click on one of the buttons below: