Krok 1: Przygotowanie
Co to jest?
Użyj BBC micro:bit do zbadania, który materiał jest najlepszym izolatorem termicznym.
Ten projekt jest opracowywany w partnerstwie z White Rose Science dla nauczycieli nauk przyrodniczych i umożliwia uczniom porównywanie codziennych materiałów na podstawie ich właściwości. Uczniowie mogą również zapoznać się z rejestrowaniem danych i korzystaniem z prostych pętli, sekwencji i zmiennych w programach komputerowych.
W tym filmie wyjaśniono, jak działa projekt i jak przeprowadzić eksperyment.
Jak to działa
- Ten eksperyment wymaga dwóch różnych programów na dwóch micro:bitach: programu sensora i wyświetlacza.
- Czujnik micro:bita działa jako rejestrator danych i rejestruje własną temperaturę. Wysyła również co minutę przez radio odczyty temperatury na wyświetlacz micro:bita.
- Wyświetlacz wyświetla temperaturę czujnika micro:bita.
- Zawiń czujnik micro:bita w materiał izolacyjny, który chcesz przetestować i umieść go w lodówce.
- Kiedy czujnik micro:bita jest wystarczająco zimny, usuniesz go z lodówki i rozpoczniesz rejestrowanie danych, lub odczytywać ręcznie, aby zobaczyć, jak szybko się nagrza.
Czego potrzebujesz
- kawałki materiału do badania, takie jak filc, folia bąbelkowa lub folia spożywcza
- dwa micro:bity
- co najmniej jeden pakiet baterii
- taśma przylepna lub papierowe klipsy do utrzymania owiniętego materiału na micro:bicie
- dostęp do lodówki
- stoper
- komputer/laptop/tablet i kabel USB, aby umożliwić wyświetlanie danych
Krok 2: Zbadaj
- Pobierz pliki hex i umieść kod na micro:bity, po przeczytaniu punktu 2 poniżej. Nie musisz sam pisać kodu dla tego projektu, aby wykonać eksperyment, ale jeśli jesteś zainteresowany kodowaniem, odwiedź poniżej sekcję Krok 4: Zakoduj to.
- Jeśli wykonujesz to doświadczenie w klasie lub klubie kodowania, każda para micro:bitów powinna mieć różne numery grup radiowych. To zapewni, że wyświetlacz micro:bita otrzyma odczyty z prawidłowego czujnika micro:bita. Otwórz projekt w Microsoft MakeCode i wprowadź unikalny numer w bloku radio usta grupę, a następnie pobierz kod na dwa micro:bity. Trzymaj je razem połączonych elastyczną taśmą lub w małej torebce. Powtórz dla każdej pary micro:bitów.
- Podłącz zestaw baterii do czujnika micro:bita.
- Zawiń czujnik micro:bita w materiał, który chcesz przetestować, i umieść go w lodówce na godzinę. Aby zapewnić uczciwy test przy porównywaniu różnych materiałów, zawsze używaj tej samej liczby warstw.
- Usuń czujnik micro:bita z lodówki, gdy osiąga tę samą temperaturę początkową za każdym razem, gdy przeprowadzasz eksperyment. Naciśnij przycisk B na wyświetlaczu micro:bita, aby sprawdzić temperaturę czujnika micro:bita. Prawdopodobnie możesz to zrobić z zamkniętymi drzwiami lodówki, jeśli jesteś wystarczająco blisko lodówki!
- Wyciągnij czujnik micro:bita, jeśli jest wystarczająco zimny. Usuń z lodówki trzymając płytkę, ponieważ ręce mogą go ogrzać.
- Rozpocznij rejestrowanie danych naciskając przycisk A na czujniku micro:bita.
- Teraz, użyj stopera lub czasomierza, aby zapewnić dokładność, wykonaj manualny odczyt temperatury czujnika micro:bit co minutę, naciskając przycisk B na wyświetlaczu.
- Zakończ eksperyment po 10 minutach, naciskając przycisk B na czujniku micro:bit, aby zatrzymać rejestrowanie danych.
Wskazówki
- Możesz chcieć przeprowadzić eksperyment na micro:bicie, który nie został opakowany materiałem jako działać jako sprawdzenie. Następnie możesz porównać te wyniki z wynikami dla mikro:bitów, które zostały opakowane w różne materiały.
- Ten eksperyment nie działa dobrze ze srebrną folią, ponieważ może blokować sygnały radiowe micro:bita lub nawet go uszkodzić.
- micro:bity nagrzewają się szybko po wyjęciu ich z lodówki. Przeprowadź eksperyment w szkolnej kuchni lub przenieś go do swojej klasy w chłodnej torbie lub pudełku.
- Jeżeli konieczne jest przeprowadzenie eksperymentu po raz drugi przy użyciu tej samej pary micro:bitów, usuń dane z czujnika micro:bita poprzez jednoczesne naciśnięcie przycisków A i B. Należy również nacisnąć przycisk resetowania na odwrocie micro:bita, aby ustawić czas w minutach z powrotem na 0.
Krok 3: Analizuj
Aby spojrzeć na zarejestrowane dane, odłącz zestaw baterii i podłącz czujnik micro:bita z powrotem do komputera. micro:bit pojawia się jako dysk USB o nazwie MICROBIT. Spójrz na dysk MICROBIT i otwórz plik MY_DATA, aby zobaczyć tabelę Twoich danych w przeglądarce internetowej:
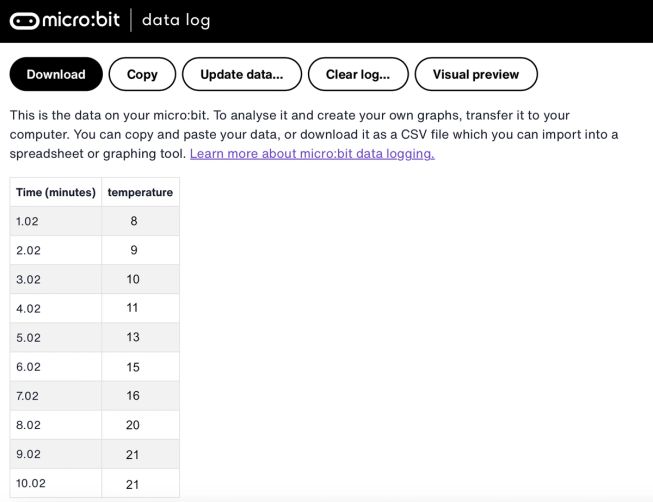
- Znaczniki czasu w dzienniku reprezentują czas, który upłynął od rozpoczęcia rejestrowania danych.
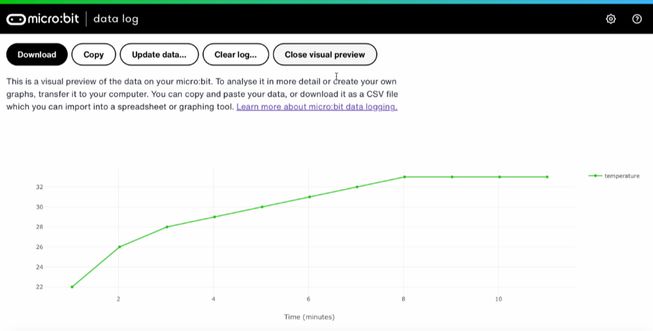
- KliknijVisual preview, aby zobaczyć graf swoich danych:
- Możesz również kliknć przycisk Copy a następnie wkleić swoje dane do arkusza kalkulacyjnego.
- Możesz porównać dane zebrane ręcznie z danymi zarejestrowanymi dla micro:bita, aby przekonać się, które z nich są dokładniejsze.
Krok 4: Zakoduj to
Obejrzyj ten film, aby dowiedzieć się, jak zakodować projekt:
Jeśli jesteś zainteresowany modyfikacją kodu dla tego projektu, kliknij przycisk poniżej: