아이들이 알고 있는 이야기와 캐릭터 개발에 대한 지식을 활용하여 AI에 대한 새로운 학습을 지원할 수 있는 좋은 방법입니다.
프로젝트 단계별 가이드
1단계: 이해하기
작동 원리
이 프로젝트에서는 BBC micro:bit가 부착된 봉제 인형의 다양한 움직임을 인식하도록 기계 학습(ML) 모델을 훈련합니다. 이야기를 다시 표현하는 데 도움이 되는 움직임을 선택합니다.
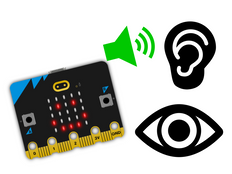
기계 학습 모델을 Microsoft MakeCode 프로그램과 결합한 후, 선택한 움직임이 감지되면 micro:bit는 소리를 재생하거나 이미지를 표시합니다.
기계 학습이란?
기계 학습(ML)은 컴퓨터가 데이터 기반으로 학습하고 판단하는 일종의 인공지능(AI)입니다.
예를 들어, ML 모델은 사용자가 micro:bit를 다양한 방식으로 움직일 때 다양한 '행동'을 인식하도록 결정하는 도움을 주기 위해 학습됩니다.
제작 방법
AI 시스템은 인간이 설계, 구축, 테스트, 사용해야 합니다.
먼저, 제공된 움직임을 사용할지, 사용자의 스토리에 맞는 다른 움직임을 선택할지 결정해야 합니다. 체조 선수가 되고 싶은 루시라는 곰에 관한 이야기이므로, 이 주제에 맞는 점프, 구르기, 잠자기와 같은 움직임을 선택했습니다.
그런 다음 데이터를 수집하여 ML 모델을 훈련, 테스트, 개선하고 컴퓨터 코드와 조합합니다. 그 후 micro:bit와 micro:bit CreateAI 웹사이트를 사용하여 AI를 이용하는 스토리텔링 장치를 만들 수 있습니다.
일반적인 알고리즘과 코드만 사용하는 프로젝트와 이 AI 프로젝트를 비교하기 위한 몇 가지 평가용 질문도 포함되어 있습니다.
2단계: 만들기
준비물
- micro:bit V2, USB 데이터 케이블, AAA 배터리 2개가 들어있는 배터리 팩
- Chrome 또는 Edge 웹브라우저를 사용하여 micro:bit CreateAI 웹사이트에 액세스할 수 있는 컴퓨터(예: 데스크톱, 랩톱, Chromebook)
- 블루투스를 사용할 수 없는 컴퓨터인 경우 micro:bit V2가 하나 더 필요합니다.
- 봉제 인형, 스트랩, 홀더 또는 봉제 인형에 micro:bit를 부착할 수 있는 기타 도구(예: 구부러지는 공예용 막대기 또는 고무줄)
- micro:bit CreateAI 교육 팁도 참조하면 도움이 됩니다.
데이터 샘플 수집
micro:bit CreateAI에서 프로젝트를 열면 봉제 인형 추천 동작(점프, 구르기, 잠자기)에 대한 데이터 샘플을 확인할 수 있습니다.
micro:bit의 움직임 센서, 가속도계를 사용하여 나만의 봉제 인형 움직임 샘플을 추가할 수 있습니다.
jumping
rolling
sleeping
micro:bit CreateAI에서 '연결' 버튼을 클릭하여 데이터 수집 micro:bit를 연결하고 지시를 따릅니다.
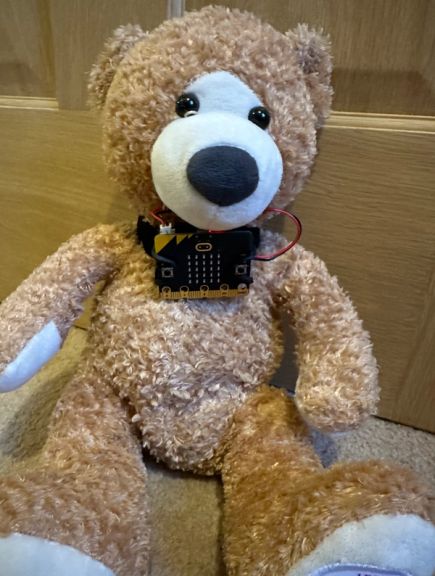
데이터 수집 micro:bit를 봉제 인형에 부착합니다. 봉제 인형의 동일한 부위에 micro:bit를 부착한 상태에서 모든 샘플을 기록하는 것이 중요합니다. 이미 만들어 놓은 샘플을 프로젝트에 사용하려면 아래 그림과 같이 micro:bit를 봉제 인형 목에 앞을 향하도록 부착합니다. 봉제 인형에 micro:bit를 부착하는 방식을 변경하려면 제공된 모든 데이터 샘플을 사용자의 데이터 샘플로 바꾸세요.

점프, 구르기, 잠자기 등 사용자가 기록한 움직임 데이터 샘플을 추가합니다. 각 행동을 차례로 클릭한 다음 '기록'을 클릭하여 각 행동에 대한 짧은 샘플을 수집합니다.
실수한 경우 원하지 않는 샘플은 삭제할 수 있습니다. micro:bit의 B 버튼을 눌러 기록을 시작할 수도 있습니다.
데이터 샘플을 검사합니다. 모든 '점프' 샘플이 비슷해 보이나요? 모든 '구르기' 샘플은 '점프' 및 '잠자기'와 달라 보이나요?
모델 훈련 및 테스트
'모델 훈련(Train model)' 버튼을 클릭하여 모델을 훈련한 후 테스트하세요.
봉제 인형을 위아래로 흔든 다음 '점프'가 추정되는 행동으로 표시되는지 확인합니다. 봉제 인형을 내려놓고 재운 뒤 '잠자기'가 추정되는 행동으로 표시되는지 확인합니다. 봉제 인형을 뒤집으면 '구르기'가 감지되는지 테스트합니다.
다른 사람이 봉제인형을 움직여도 행동이 잘 감지되는지 확인합니다.
모델 개선
대부분의 모델은 데이터가 많을수록 더 개선될 수 있습니다. 모델의 사용자 행동 인식 능력을 개선해야 한다면 ‘← 데이터 샘플 편집(Edit data samples)’을 클릭하세요.
적합하지 않다고 생각되는(동일한 행동에 대한 샘플과 완전히 다르기 때문) 샘플을 삭제하여 데이터 세트를 정리할 수 있습니다. 또한 자신과 다른 사람의 샘플을 추가하여 모델을 개선할 수도 있습니다.
봉제 인형이 '잠잘' 수 있는 모든 위치를 검토해 보면 x, y, z 선이 micro:bit의 각도에 따라 순서가 달라지는 것을 알 수 있습니다.
모델을 한 번 더 훈련하고 다시 테스트합니다.
모델과 코드를 micro:bit에 넣습니다.
micro:bit CreateAI의 ‘MakeCode에서 편집(Edit in MakeCode)’을 클릭하면 MakeCode 편집기에서 프로젝트 코드를 볼 수 있습니다.
다른 micro:bit MakeCode 프로젝트와 마찬가지로 코드를 수정할 수도 있고, 그대로 사용해 볼 수도 있습니다.
USB 데이터 케이블로 micro:bit를 연결하고 MakeCode 화면의 '다운로드(Download)' 버튼을 클릭한 후 안내에 따라 AI 모델과 코드 블록을 micro:bit로 전송하세요.
micro:bit를 분리하고 배터리 팩을 끼운 후 봉제 인형에 부착하여 테스트합니다.
코드 블록 작동 방식
'ML 시작' 블록은 ML 모델이 감지하도록 훈련된 행동 중 하나를 봉제 인형이 시작했다고 판단할 때 트리거됩니다. ML 모델이 추정한 봉제 인형의 행동에 따라 다른 소리가 재생되고 micro:bit LED 디스플레이에 다양한 아이콘이 표시됩니다.
' ML 종료' 블록은 봉제 인형이 행동을 완료했다고 ML 모델이 판단할 때 트리거됩니다. 각 블록의 코드는 화면을 지우고 소리 재생을 모두 중지합니다.
추가 블록인 'on ML unknown start'는 봉제 인형이 어떤 행동을 하는지 모델이 확신하지 못하면 화면을 지웁니다.
평가
다양한 움직임에 반응하는 가속도계 센서를 사용하지만 기계 학습이나 다른 종류의 AI를 사용하지 않는 센서 토이 프로젝트와 이 프로젝트를 비교해 보세요.
- 센서 토이 프로젝트는 어떤 종류의 움직임 또는 행동에 반응할까요?
- AI 스토리텔링 친구 프로젝트가 반응하는 행동의 종류는 어떤 점이 다른가요? 더 간단한가요, 아니면 더 복잡한가요?
- ML 모델이 인식하도록 훈련하고 싶은 행동은 무엇인가요?
- 어떤 프로젝트가 나의 이야기를 더 잘 전달할 수 있을까요?
3단계: 확장하기
- AI 스토리텔링 친구를 활용하여 다양한 움직임을 탐색하고, 잘 알려진 설화나 동화의 내용에 맞게 행동을 변경해 보세요.
- '아이콘 표시' 블록 대신 'LED 표시' 블록을 사용하여 스토리에 맞게 아이콘을 사용자 지정하세요. LED 계획 시트를 사용하여 사용자 지정 아이콘을 만들 수 있습니다.
- 학급 마스코트가 있는 경우, CreateAI를 통해 마스코트가 학생들에게 피드백(예: 칭찬 또는 학급 포인트 보상)을 주는 움직임에 반응하는 훈련을 시키세요.
This content is published under a Creative Commons Attribution-ShareAlike 4.0 International (CC BY-SA 4.0) licence.


